Add breakout rooms
In a group consultation, you can create breakout rooms and move participants into them.
Example: You want participants to pair up and work through a role play. You can create as many breakout rooms as you need to, and assign two people to each room. At the end of the activity, you can close the breakout rooms and return all participants to the main room.
Note: Breakout rooms are not available when running a group consultation from a mobile. Participants can attend via mobile, however.
Allocate participants to breakout rooms
Remove or close a breakout room
Hide the breakout room control panel
Send chat messages in breakout rooms
Move a participant between rooms
Remove a participant from the call
Add a breakout room
To add a breakout room to your group consultation call:
-
Start a group consultation call and admit all the participants. For more information, see Group consultation.
-
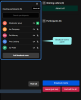
Select Breakout rooms. The breakout rooms control panel opens.
-
Select Add breakout room. Breakout room #1 is created. Repeat this step to create additional breakout rooms.

Note: By default, service users![]() A person who is seeking care or advice from a service provider via video call. A service user may be a patient, client, consumer, citizen, or similar. can only see each others' initials. If you want them to see each others' full names, ask your administrator to enable this feature. For information about how to display service users' full names, see Default Group Consultation Settings.
A person who is seeking care or advice from a service provider via video call. A service user may be a patient, client, consumer, citizen, or similar. can only see each others' initials. If you want them to see each others' full names, ask your administrator to enable this feature. For information about how to display service users' full names, see Default Group Consultation Settings.
Rename a breakout room
To rename a breakout room:
-
Hover over the breakout room name. To begin with, this may be something like 'Breakout room #1'.
-
Select
 (three dots icon), and then select Rename.
 -
In the Room name field, highlight the existing name to select it, and then enter the name you want.
-
Select OK. The new name is applied.
Allocate participants to breakout rooms
To allocate participants to the breakout rooms you have created:
-
In the breakout rooms control panel, hover over a participant's name.
-
Select
(Breakout room user controls button). -
Select the breakout room you want to send the participant to. The participant is moved to that room immediately.
Repeat these steps for each participant you want to place into a breakout room.
Note: Participants receive a notification on their call screen when they have been moved into a breakout room. They can select the X in the corner of the notification to close it. All participant call screen controls remain available while breakout rooms are in use.
Join or leave a breakout room
As the moderator, you can join or leave any of the breakout rooms at any time.
To join a breakout room, hover over the breakout room name and then select Join. You can do this from within the main room or another breakout room.
To leave a breakout room, select Leave breakout room.
Search for participants
With a large number of participants, it can be hard to remember which breakout room someone is in. To locate a participant, enter their name into the Search participants field at the top of the breakout rooms control panel. Select the participant's name from the results that appear.
If necessasry, you can then move the participant to another room, or move them back to the main room.
Remove or close a breakout room
To close a breakout room and return its participants to the main room:
-
Hover over the breakout room name.
-
Select
 (Breakout room controls button) and then select Close.
If you create a breakout room that you do not need, you can remove it as follows:
-
Hover over the breakout room name.
-
Select
(Breakout room controls button) and then select Remove.
Hide the breakout room control panel
If you need more room on your screen, you can hide the breakout room control panel. To do this, select the X in the top right of the panel.
To unhide the panel, select the Breakout rooms button.
Mute all participants
To mute all participants at once, in the breakout rooms control panel, select Mute All. If you need to ask a participant to unmute themselves, you can do this via the remote user controls.
For more information about muting microphones during group consultations, see Group consultations: Mute everyone's microphone.
Access remote user controls
When you are using breakout rooms, the ![]() (Remote user controls button) that lets you mute a participant's microphone, pause their video, adjust their volume, and more, appears in the breakout room control panel.
(Remote user controls button) that lets you mute a participant's microphone, pause their video, adjust their volume, and more, appears in the breakout room control panel.
To access this button, hover over a participant's name in the breakout room control panel. For more information about the remote user controls, see Group consultation moderator controls.
Send chat messages in breakout rooms
If chat messaging has been enabled for the group consultation waiting area you are using, you can send a chat message to all the participants in a certain breakout room, or to an individual participant in a breakout room.
Note: Chat messages can only be sent within each breakout room. It is not possible to send a chat message to all breakout rooms at once. Participants who are added to a breakout room after others have been using the chat feature will be able to see the full chat history of the room.
To send a chat message to all the participants in a breakout room:
-
Join the breakout room. For instructions, see Join or leave a breakout room.
-
Select the
 (Chat button) from the call screen control bar. The chat panel opens.
 -
In the Type a message field, enter the text you want to send.
-
Select
 (Send a chat button).
Your message and any responses participants send will be visible to everyone in the breakout room.
To send a private chat message to an individual participant in a breakout room:
-
Join the breakout room. For instructions, see Join or leave a breakout room.
-
Hover over a participant's name and then select
(Breakout room user controls button). -
Select Send private message. The chat panel opens.
-
In the Type a message field, enter the text you want to send.
-
Select
(Send a chat button).
Note: By default, service users' initials only are displayed on their video tiles and chat messages in the group consultation call screen. If they need to see each other's first and last names, ask your administrator to enable this. For more information, see Default Group Consultation Settings.
For more information about chat messages, see Send a chat message.
Move a participant between rooms
To move a participant from one breakout room to another, or to move them back to the main room:
-
In the breakout rooms control panel, hover over a participant's name and then select
(Breakout room user controls button). -
Select the room you want to send the participant to. The participant is moved to the selected room, and they receive a notification that they are entering that room.
Remove a participant from the call
While breakout rooms are in use, you can remove a participant from the call if necessary. To do this:
-
In the participants panel, select Participants. The Participants list opens.
-
Select
 (x button) beside the name of the participant you need to remove from the call, and confirm that you wish to remove the person.